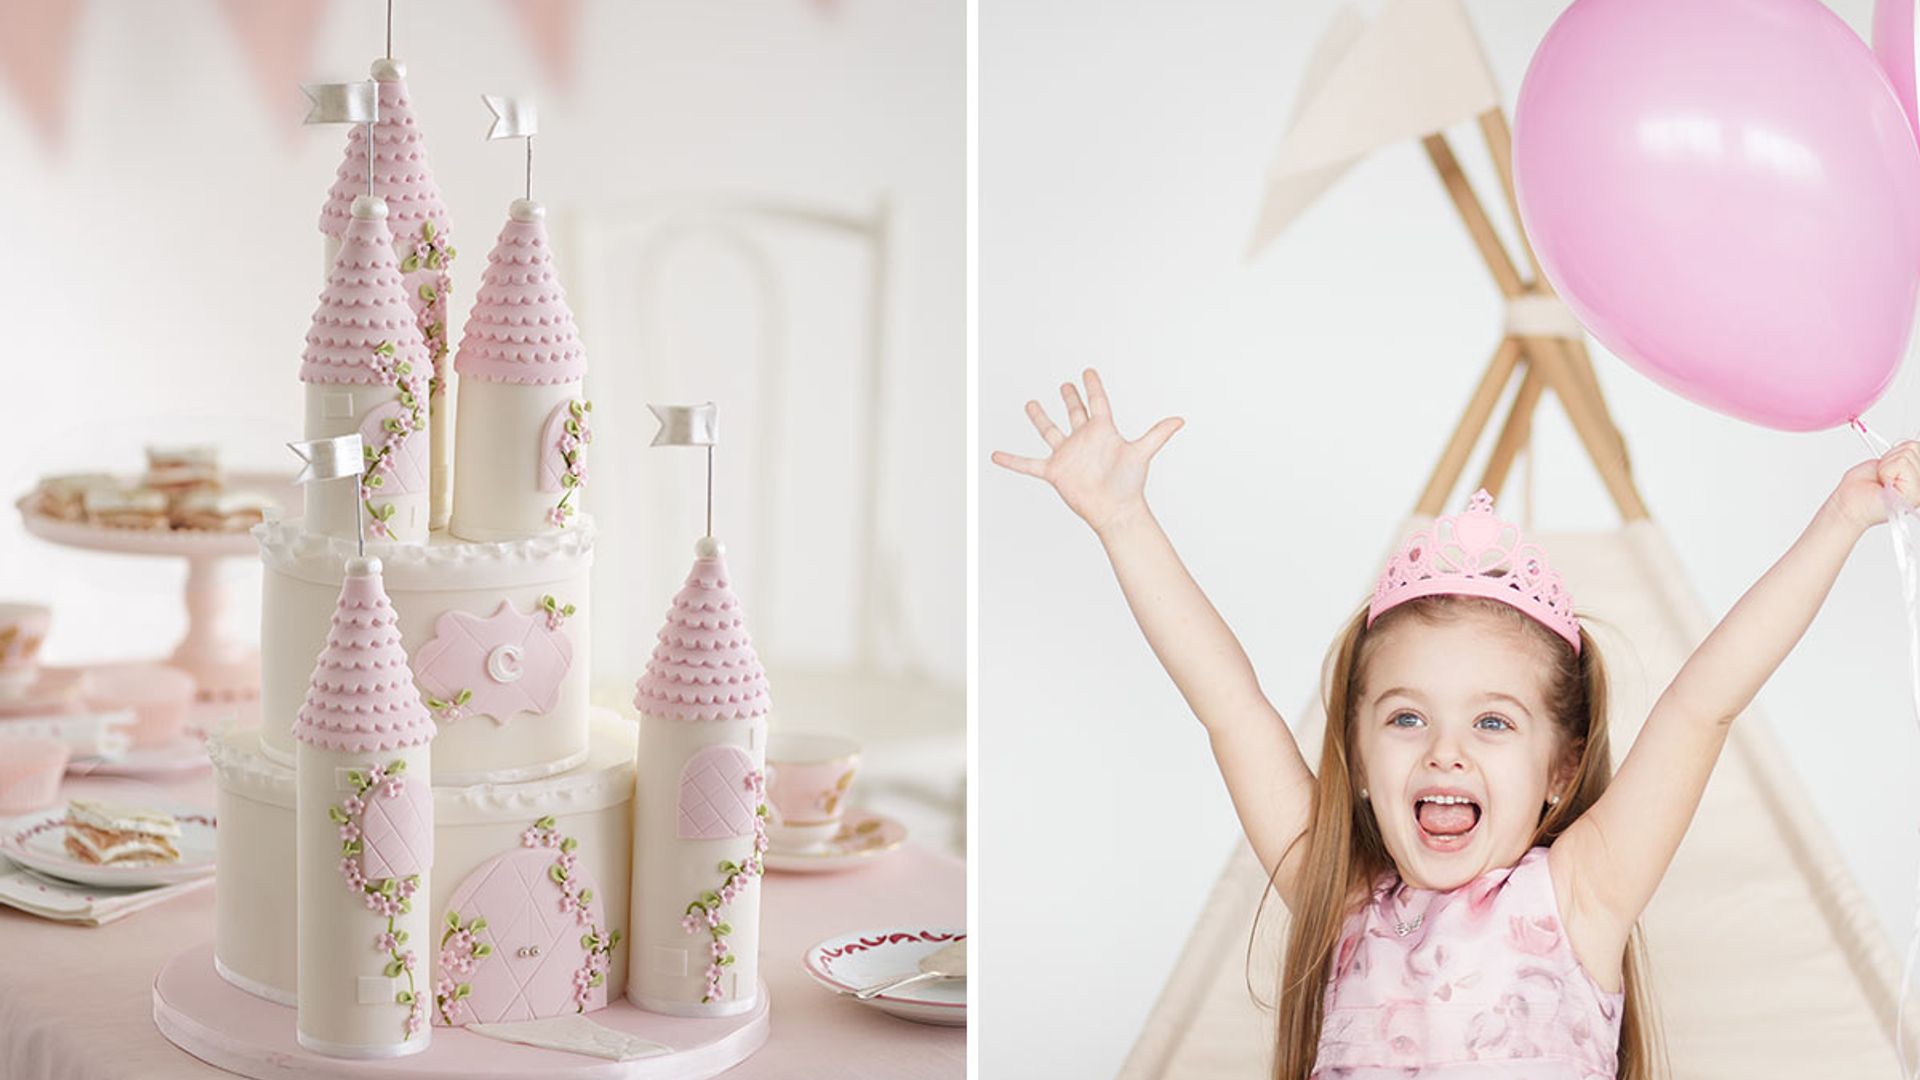
Ah cake week, it's always one of the most popular weeks on the Great British Bake Off and this year certainly didn't disappoint. From sweet shops to spaceships and even a dog cake, we had it all when it came to the infamous showstopper. If the bakers' dream childhood birthday cakes, like us, filled you with nostalgia and the urge to get back in the kitchen, we have you sorted. This beautiful fairy tale castle is the ultimate cake for children's parties and birthdays - a showstopper that is sure to make any kid's dreams come true... 3-2-1-Bake!
FAIRY TALE CASTLE CAKE
Makes 1 castle cake, preparation time 3 hours, cooking time 1 ½ hours
INGREDIENTS
For the 15cm/6in cake
• 300g/11oz butter, at room temperature
• 300g/11oz caster sugar
• 6 eggs
• 1 tsp vanilla essence
• 300g/11oz self-raising flour
For the 20cm/8in cake
• 450g/1lb self-raising flour
• 450g/1lb caster sugar
• 450g/1lb butter, at room temperature
• 8 eggs
• 1 tsp vanilla essence
For the buttercream icing
• 750g/1 1/4lb icing sugar
• 250g/9oz butter, at room temperature
• 40ml1 1/2fl oz whole milk
• 1 tbsp vanilla essence
• 8 tbsp raspberry jam
For the turrets
• 12 cupcakes
• 5 ice cream cones
To decorate
• 2kg/4 1/2lb ready-to-roll white fondant
• 1 x 250g tub of ready-to-use royal icing
• Renshaw’s white modelling paste
• Edible glue (available from Amazon)
• Edible silver balls
• Pink and green food gel
• Mini sugar blossoms and mini sugar leaves (from Hobbycraft and Amazon)
• 5 x sugar flags
MORE: How to make a train cake for your child's birthday and win major mum points!
INSTRUCTIONS
1. Preheat the oven to 170°C, 325°F, Gas 3 and grease and line 2 x 15cm/6in and 2 x 8in/20cm cake tins.
2. Start by making the 2 x 15cm/6in. Mix together the butter and sugar until light and fluffy. Add in one egg at a time to the mixture with the vanilla until well mixed and finally spoon the self-raising flour into the mixture, stirring to combine.
3. Divide the mixture between the prepared 15cm/6in tins, place them on the middle shelf of the oven and bake for 45-50 minutes until well risen and light golden brown.
4. Next, make the 2 x 20cm/8in cakes. Simply repeat the above method using the 20cm/8in cake ingredient list and bake in the preheated oven for 50-55 minutes. Leave all 4 cakes to completely cool before icing.
5. For the buttercream icing, whisk the icing sugar and butter together in a bowl, gradually adding the milk and vanilla until light and fluffy.
6. Once the cakes are cool, trim a little bit from the top of each one so they are nice and flat and then slice each in half. Spread each cake with raspberry jam and buttercream icing then sandwich together again until you have 3 layers. Repeat the same process for 20cm/8in cakes.
7. Using a 5cm/2in round cookie cutter, cut each of the 12 cupcakes to make cylinders. Then, as with the larger cakes previously, trim a little bit from the tops to get them nice and flat. Use 3 cupcake cylinders to create each of the 2 taller towers at the front. Sandwich these together using a little jam. For the 3 top towers, use 2 cupcake cylinders for each and sandwich together using jam.
Coat the 2 larger cakes and the 5 towers in a thin layer of buttercream and then roll out the ready-to-roll white fondant (reserve roughly a quarter of this for later) and cover the cakes and towers with this, creating a smooth edge (the buttercream icing will help it stick).
8. To create the frilled trims on the 2 cakes, roll out some white modelling paste (it needs to be long enough to wrap around the top of the largest cake), rolling it paper-thin so it is almost see-through.
9. Place the rolled paste onto a foam mat and using a ball tool (approximatley 1cm/1/2in) roll the ball half on the paste and half on the mat back and forth to create a frill. Do this on just on one half of the paste. Once frilled, use a little edible glue and brush a small amount around the top of the cake where the frill will be placed. Stick the frill onto the cake and repeat again to get a double layer.
10. Place the larger 20cm/8in cake on a cake board. Insert 6 jumbo straws into the 8in/20cm cake and trim so they are level with the top of the cake. Then place the 15cm/6in cake on top (the straws will help support this).
11. To finish the towers. Use ready-to-use royal icing to secure the ice cream cones on top of the 5 towers to create your roof. Taking some ready-to-roll white fondant icing (you’ll just need to put aside a small amount for the white bricks to finish), add a couple of drops of pink food gel and knead until you achieve a pale pink colour. Roll out and cut strips of icing (long enough to reach round the ice cream cones). Using a scalloped cookie cutter, stamp out along the lengths of the icing to create the frilled edges. Using a little ready-to-use royal icing gradually wrap and stick your frilled bands of icing around each of your cone roofs until you reach the top of the towers.
12. Roll out some additional pink fondant icing if needed and cut out shapes for the tower windows, door and central initial emblem (you can also find lots of shape patterns online to print off and trace around). Lightly score the window and door with a sharp knife or scalpel to create a glass effect, and then attach to the cake using a little white royal icing.
13. Using some white fondant icing, cut out small squares and stick on to the towers to create a brick effect.
14. For the branches, mix green food gel with a little water and paint these onto the castle and tower walls. Attach mini sugar leaves and mini sugar blossoms using a little white royal icing.
15. Finally, stick 2 mini edible silver balls onto the door for the handles using white royal icing and finish by inserting mini decorative flags into the top of the ice cream cones to finish off the turrets.
You can also order this cake from CoopCake Designs coopcake.co.uk
Recipe by Annabel Karmel. Join the AK Club for free today and be the first to discover exclusive recipes and special content, insider news, competitions, plus a host of great offers. Get inspired by visiting annabelkarmel.com.


