The early postpartum period can feel a bit like a blur - part magic, part mayhem! Maybe you’re reading this whilst still living in that dreamy (and slightly hazy) newborn bubble, or maybe you’re a few months down the line, where sleep feels patchy and you’ve forgotten exactly what day of the week it is. Either way, you and your body have done something incredible! It never fails to amaze me how the female body can create, birth, rest, recover and rebuild. However, although the body is fantastic at moving through much of this process on its own, postpartum, there are targeted exercises we can do to support our body and help us to achieve a more efficient recovery.
The truth is, your body has been through a monumental transformation, and it needs a little time to return to strength and balance. If you’re sitting there, feeling slightly detached from your body and wondering where to even begin, you’re not alone. Early postnatal exercises might seem simple, but they’re also restorative and most importantly, effective to help you lay the best foundations for your future health and fitness. As a women’s health expert, who’s trained postnatal women for over 15 years, here’s my roadmap to feeling strong, confident and centred as a new mum.
The 3 pillars
If I’m honest, the topics we could cover on postnatal recovery are pretty endless, but in the interest of getting you the most important facts, there are three main pillars of postnatal recovery: the pelvic floor, the rest of the core and your posture. Here are the exercises and methods I’d recommend across all three.
Before we dive into the facts, let me quickly confirm that all of the below exercises can be used after your 6- or 8-week check with your GP. Possibly sooner, the current guidelines say that you can work on pelvic floor exercises like Kegels anytime after birth, as soon as you feel ready. However, when it comes to progressing movement, as we’ll look at now, these exercises are best tried after you’ve been given the all clear to exercise by a medical professional like your GP or midwife.
The pelvic floor
 © Getty
We often think about the pelvic floor as 'small' when compared to other muscles in the body. But incredibly, its links run far and wide. There is deep body tissue, known as myofascia, which covers our entire skeletal frame like a suit. These lines of fascia connect various areas of the body, and there are lines that connect the pelvic floor from the bottom of your feet all the way up to the jaw.
With postnatal clients, one of the first things I look to determine is whether women need support strengthening their pelvic floor, or releasing it, both of which can be necessary post-birth.
If you notice that you are clenching your jaw, gripping through your toes or experience consistent pain in the lower back, this may indicate an ‘overactive’ (overly tight) pelvic floor. In which case, we need to prioritise pelvic floor release techniques. As there is a strong link between the pelvic floor and the jaw, these movements can include jaw release exercises like massaging the masseter muscles (either side of your jaw) to encourage pelvic floor release.
Exercise 1 - Masseter massage:
 © Alamy
Place your forefinger and middle finger on either side of your jaw, about a cm in front of your ears, where the joint sits. You’ll feel the muscle move if you gently open and close your mouth. Keep your mouth slightly ajar so the muscles are relaxed and not clenched. Using your fingers, apply light to moderate pressure to the masseter muscle. Massage the area with slow, circular motions, focusing on any tight or tender spots. Take slow, deep breaths as you work - aim for 30-60 seconds. You can do this a few times a day to help ease tension in the jaw and pelvic floor.
Exercise 2 - Pelvic floor release:
Sit or lie back comfortably on the floor. Place the soles of your feet together, allowing your knees to gently fall out to the sides in the butterfly position. Place your hands on your belly or thighs, wherever feels comfortable. Inhale a slow, deep breath, feeling your belly and ribcage expand, allowing your pelvic floor to release. Avoid bearing down and instead visualise a flower opening to encourage pelvic floor release. On the exhale, let the breath fall out without effort. Don’t engage or tighten the pelvic floor. Repeat for 2-3 minutes.
If, however, you are experiencing symptoms of a weakened pelvic floor, such as pressure or bulging at the base of your pelvic floor, incontinence or struggling to hold urine or trouble holding in wind, then exercises to strengthen the pelvic floor are needed. Initially, I would recommend exercises such as single-leg knee raises and the bridge.
Exercise 3 - Single leg knee raises:
Lying back on the floor, place the soles of your feet flat to the floor, keeping your legs hip-width apart. Inhale and as you exhale, focus on drawing up the pelvic floor, whilst lifting one knee up towards your chest, ending in the table top position, with your knee and hip bent to a 90 degree angle. Inhale and lower that leg back to the floor. Repeat on the other side and continue alternating throughout this exercise.
Exercise 4 - The Bridge:
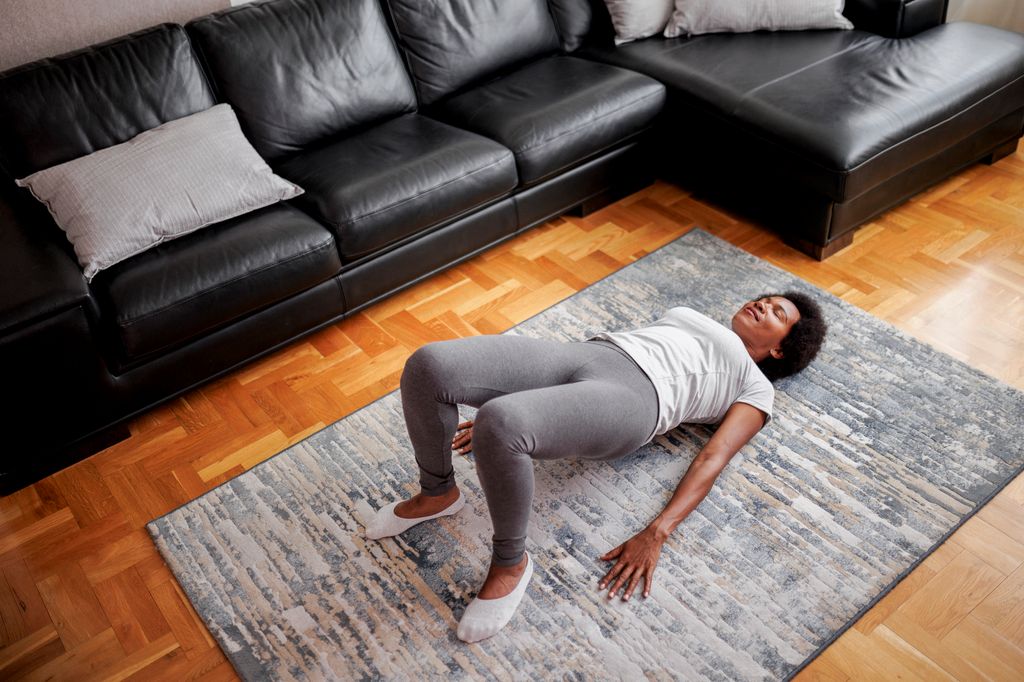 © Getty Images
This exercise is fantastic to gently progress the work of your pelvic floor, whilst bringing in other areas of the core, such as the glutes and the lower back. Lie on the floor with your knees bent, soles of your feet flat on the floor hip-width apart, and arms resting by your sides. Inhale to prepare, and as you exhale, draw your pelvic floor as you simultaneously activate your glutes, pressing through your heels to lift your hips toward the ceiling, creating a straight line from shoulders to knees. Pause at the top for 2-3 seconds, keeping your core and glutes engaged. Lower your hips back down with control, avoiding any sudden drops.
Posture
 © Getty Images
Honestly, I wish I could make the word 'posture' sound more interesting, but despite sounding boring, this is one of the most important parts of postnatal recovery. Because posture plays a big part in how everything recovers, the pelvic floor, our abdominals, everything.
During pregnancy, our posture shifts in various ways, most notably by the tilt in our pelvis. As the baby grows, the pregnancy bump will place increased pressure on the front of our abdominal wall and cause the pelvis to tilt forward. In this position, there is also more pressure on the pelvic floor, as the weight of our internal organs, baby, placenta and amniotic fluid, etc., shifts off the bony structures of the pelvis and rests more heavily on the pelvic floor.
To realign our posture, we want to look at two key areas: our glutes (to establish pelvic stability), and our upper back, which can often round if we’re sitting for long periods nursing a baby.
Exercise 5 - Clam:
Alongside the bridge, which we have already outlined above, the clam is a great postnatal exercise to help us work the glutes and realign our pelvis. Lie on your side with your knees bent, stacked on top of each other, feet on top of each other and in line with your hips. Rest your head on your arm for comfort. Inhale as you exhale. Think of drawing up your pelvic floor as you lift your top knee towards the ceiling, keeping your feet together. As if opening a clamshell. Avoid letting your hips roll to the side, keeping everything in line. Hold for a moment, then as you inhale, bring the knee back down. Repeat for 10-12 reps and then perform on the other side.
Exercise 6 - Y’s and T’s (for the upper back):
Sit or stand to begin. If standing, take a split stance, keep one foot slightly ahead of the other, but keep your legs hip-width distance apart. To prepare, lift your arms straight out in front of you at chest height. Inhale and as you exhale, draw your arms overhead and out into a Y shape, thumbs upwards. Avoid over-arching the back and keep your arms slightly in front of your ears. Inhale, bringing your arms back down to chest height in front of you, keeping them relatively straight. On the next exhale, move your arms out to the side into a T shape at shoulder height. Thumbs facing up. Inhale and take your arms back to centre. Repeat for 10-12 reps.
Complete core
 © Getty Images
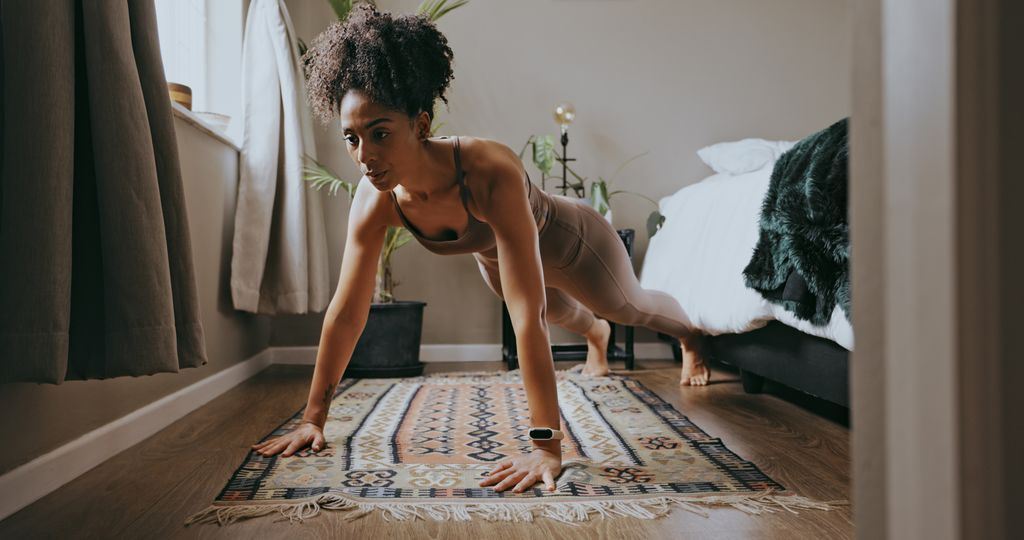
The 'core' isn’t just the pelvic floor or abdominals. Our complete core includes our pelvic floor, abdominals, multifidus (lower back muscles), adductor and abductors (thigh muscles), glutes and our respiratory system (connected via the diaphragm). A great exercise to target all of these is the bird-dog exercise.
Exercise 7 - Bird-Dog:
Begin on all fours, hands under shoulders, knees under hips, spine in a neutral position. Inhale and as you exhale, extend one arm forward, whilst simultaneously lifting the opposite leg back, keeping your hips level and your body stable. Inhale and return to the centre. Repeat on the other side. Repeat 8-10 times on each side.
This next step
Your postnatal body isn’t something to "fix", it’s something to reconnect with. These early movements aren’t about perfection; they’re about tuning back in and giving your body the support it deserves.
Remember, gentle doesn’t mean ineffective; it means moving with intention. With consistency, these movements can help to support you in feeling stronger and at home in your body again. Move with kindness and let your strength unfold, one steady step at a time.